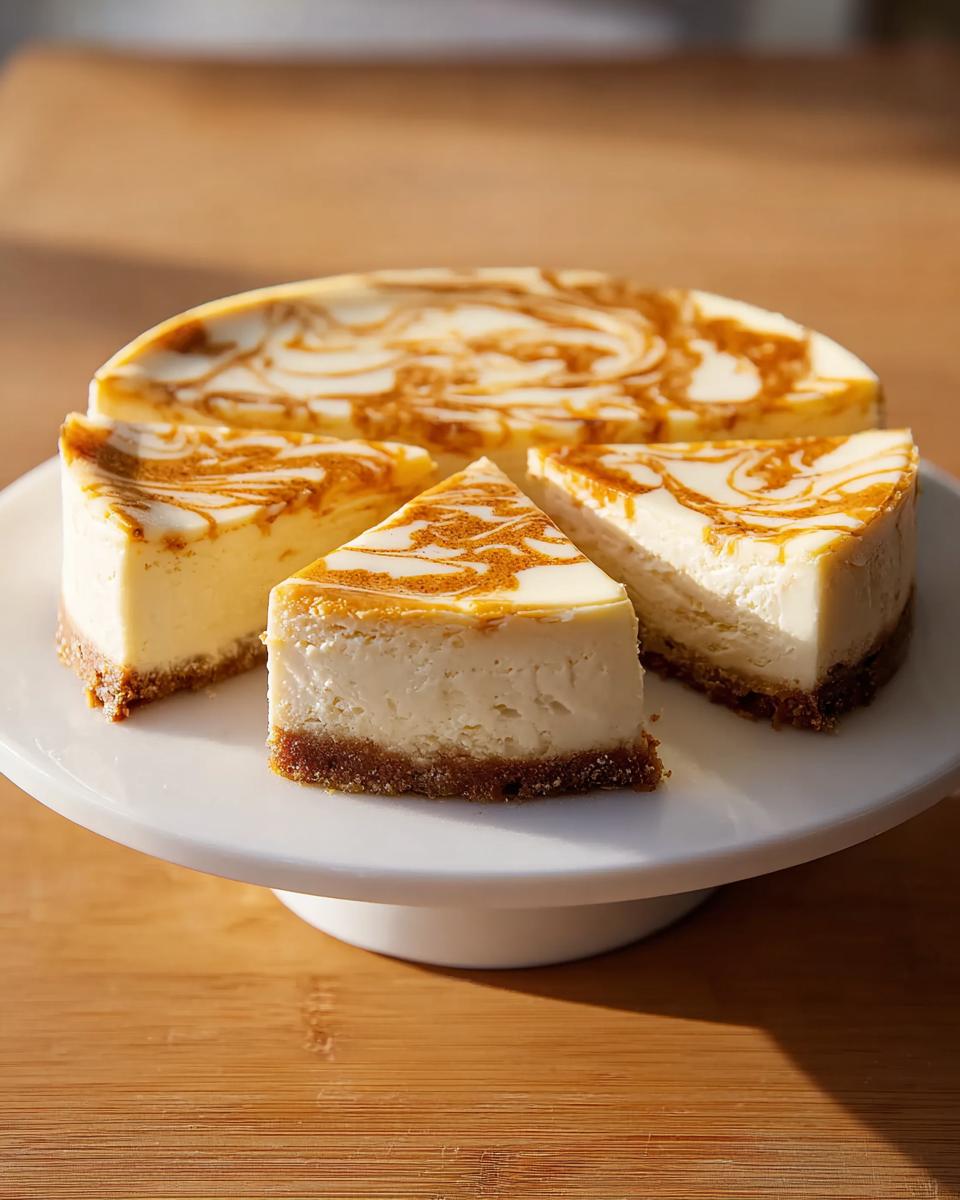
Oh, autumn! The air gets crisp, the leaves turn those gorgeous shades of red and gold, and honestly, all I want is something warm, comforting, and utterly delicious. And what’s more comforting than cheesecake? But this isn’t just any cheesecake; this is my Pumpkin Cheesecake Swirl Bliss! It’s a little bit of magic I stumbled upon years ago when I had some leftover pumpkin puree and decided to get a little creative. Turns out, swirling that spiced pumpkin into a rich, creamy cheesecake base is pure genius! As a recipe developer, I’m always looking for that perfect balance of flavor, texture, and a little bit of that ‘wow!’ factor, and believe me, this one delivers. It’s beautiful, surprisingly easy to make, and tastes like the coziest fall hug you can imagine. You can find more fun recipes like this over at yummro.com, but this Pumpkin Cheesecake Swirl Bliss is a keeper, I promise!
Why You’ll Love This Pumpkin Cheesecake Swirl Bliss
Seriously, what’s not to adore about this cheesecake? It’s the perfect dessert for so many reasons:
- Incredible Flavor Combination: You get that smooth, tangy cheesecake tang *and* those warm, cozy fall flavors from the pumpkin and spices. It’s a match made in heaven!
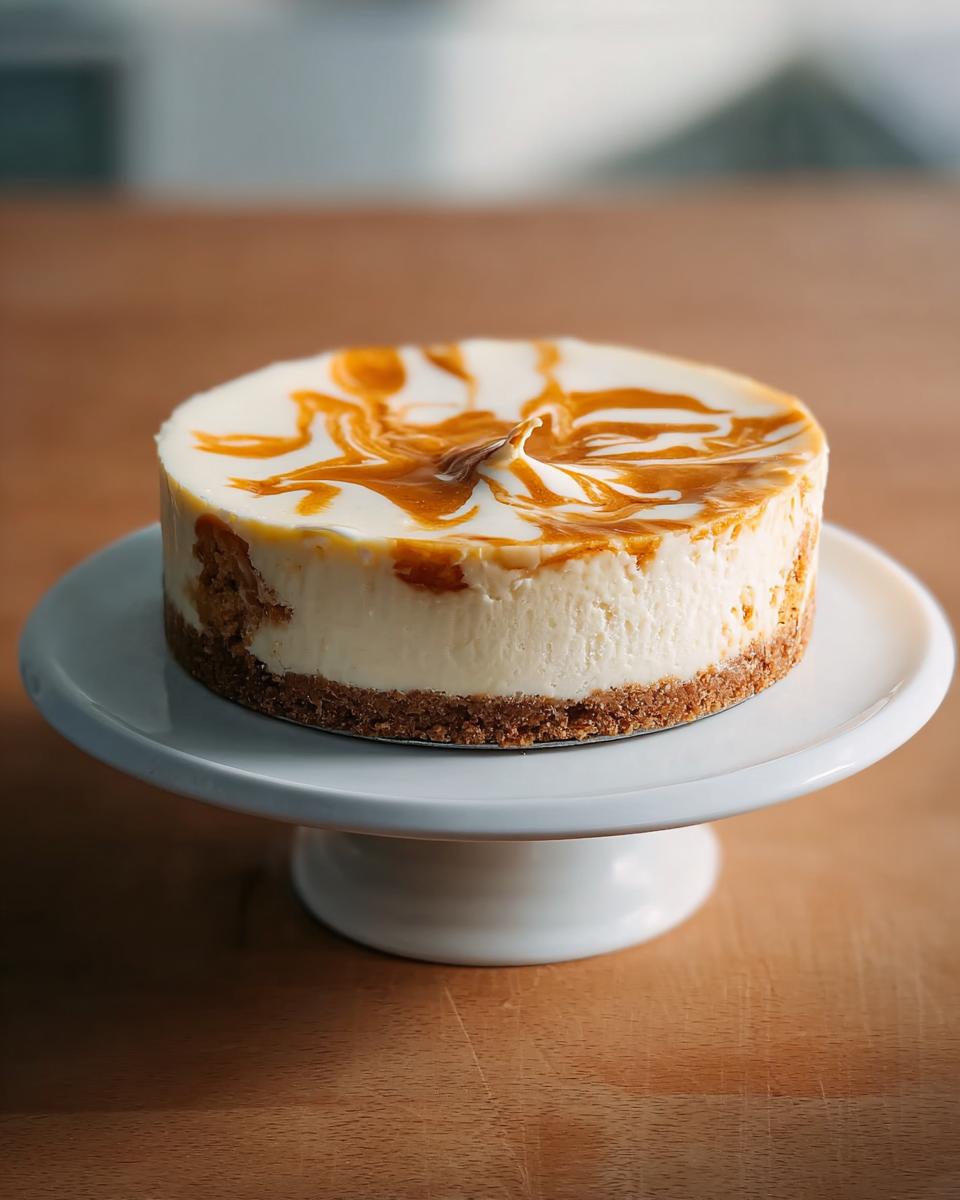
- Visually Stunning: That swirl effect? It looks fancy, but it’s totally doable, making your dessert table look extra special for holidays like Thanksgiving.
- Surprisingly Easy: I know cheesecake can sound intimidating, but this recipe is genuinely straightforward. The swirl is simple, and the results are always impressive.
- Make-Ahead Magic: This is the ultimate dessert to make ahead. It actually tastes better after chilling overnight, which means less stress on the big day!
Gather Your Ingredients for Pumpkin Cheesecake Swirl Bliss
Before we get baking, let’s make sure you’ve got everything ready to go! Having your ingredients prepped makes the whole process smoother, trust me. For this delightful Pumpkin Cheesecake Swirl Bliss, we’ll need a few things for our crust and then the stars of the show for the filling.
Crust
This is the crunchy base that holds everything together!
- 1 cup graham cracker crumbs (this usually comes from about 8 graham cracker sheets, so around 5 ounces)
- 2 tablespoons unsalted butter, melted
- 2 tablespoons sugar
Filling
And here’s where the magic happens! We’re talking rich, creamy, and perfectly spiced.
- 2 pounds cream cheese, make sure it’s totally softened to room temperature (that’s four 8-ounce bars)
- 1 1/2 cups sugar (plus an extra 2 tablespoons for later!)
- 1 pinch salt
- 1 teaspoon vanilla extract
- 4 large eggs, also at room temperature – this is super important for a smooth texture!
- 1 cup solid-pack pumpkin puree. Now, this is key! Using *solid-pack* pumpkin puree (not pumpkin pie filling) gives you that pure pumpkin flavor without any extra sugars or spices already added. It’s the best way to control the flavor.
- 1/2 teaspoon ground cinnamon
- 1/4 teaspoon freshly grated nutmeg – you can absolutely use pre-ground, but freshly grated nutmeg has such an amazing aroma!
Essential Equipment for Making Pumpkin Cheesecake Swirl Bliss
Okay, so you don’t need a fancy bakery setup for this cheesecake, but having the right tools makes all the difference! Here’s what you’ll want to grab:
- A 9-inch springform pan: This is a must-have! The removable sides make it so easy to get your beautiful cheesecake out without damaging it. No more stuck-on sides!
- Parchment paper: We’ll use this to line the bottom of the pan. It’s like a little insurance policy against sticking and helps with easy release.
- An electric mixer: Whether it’s a stand mixer or a hand mixer, this will make beating your cream cheese and eggs so much smoother and faster. Your arm will thank you!
- A roasting pan: This is for our water bath technique, which is key for that super creamy, crack-free finish. A large, shallow pan works best.
- A wooden skewer or toothpick: Handy for swirling that pumpkin mixture and checking if your cheesecake is done.
Step-by-Step Guide to Your Pumpkin Cheesecake Swirl Bliss
Alright, let’s dive into making this gorgeous Pumpkin Cheesecake Swirl Bliss! It’s really not as complicated as it might seem, and watching it come together is half the fun. Just follow these steps and you’ll have a showstopper dessert.
Preparing the Crust
First things first, let’s get that crust ready. Preheat your oven to 350°F (175°C). Grab your 9-inch springform pan and line the very bottom with a round of parchment paper. In a medium bowl, mix up those graham cracker crumbs, the melted butter, and the sugar. Just stir it until it all looks like damp sand. Now, press this mixture down really firmly onto the bottom of your prepared pan. A flat-bottomed glass works like a charm for this! Pop it in the oven for about 10 minutes, just until it’s set and smells toasty. Let it cool on a wire rack while we get the filling ready.
Crafting the Creamy Filling
Time for the star of the show! Turn your oven temp down to 325°F (160°C). Before we do anything else, wrap the outside of your springform pan really well with a double layer of aluminum foil. You want to make sure no water seeps in for our water bath later. Get a kettle of water boiling, too – it’ll be needed for the bath! Now, grab your softened cream cheese and whip it up in a big bowl with your electric mixer on medium speed for about 3 minutes until it’s super fluffy and smooth. Lower the mixer speed and slowly add in that 1 1/2 cups of sugar. Then, toss in the salt and vanilla, and beat it until it’s all combined. Here’s a little tip from my kitchen: add your eggs one at a time, mixing *just* until each one disappears. Don’t overmix here; we don’t want too much air whipped in, or it can cause cracks!
Creating the Pumpkin Swirl
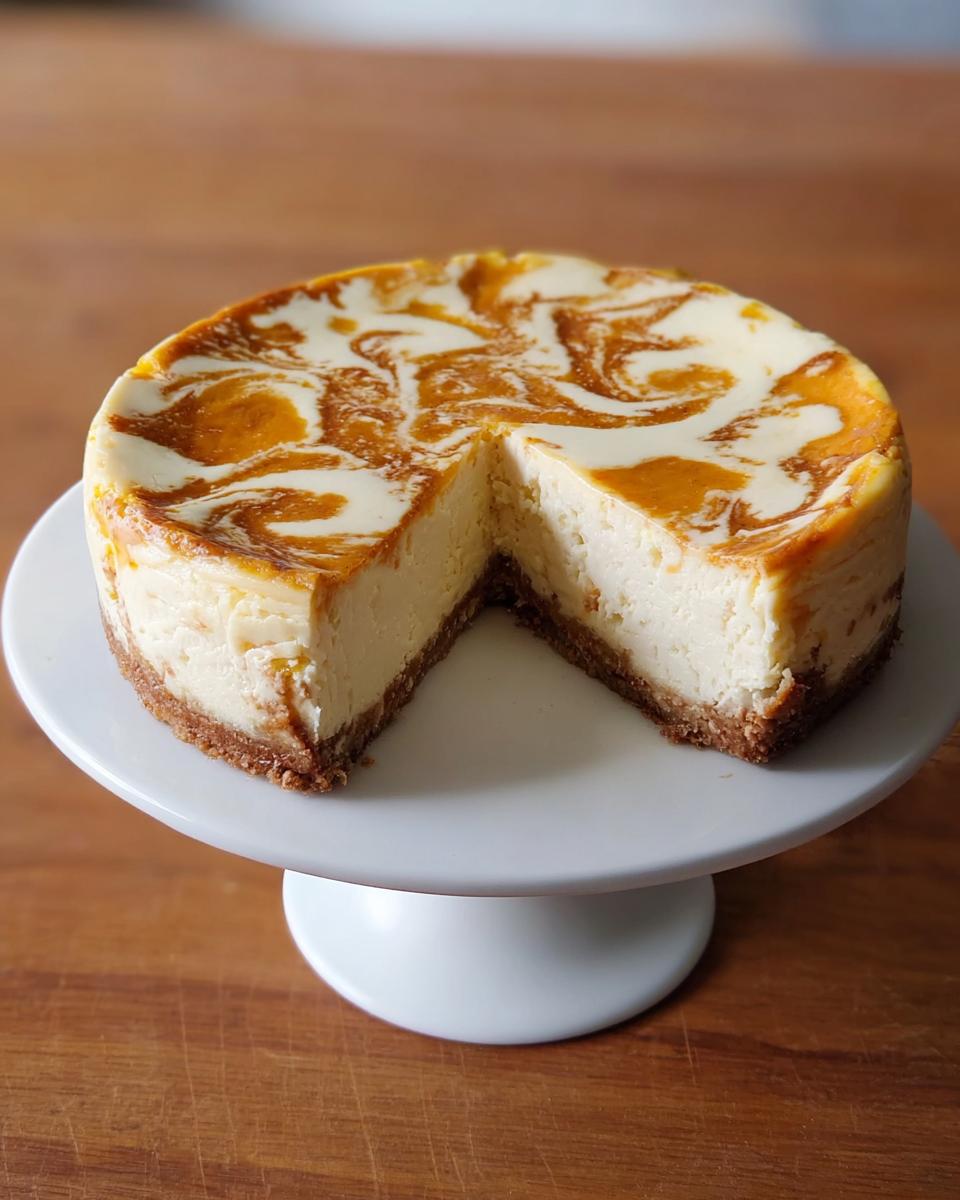
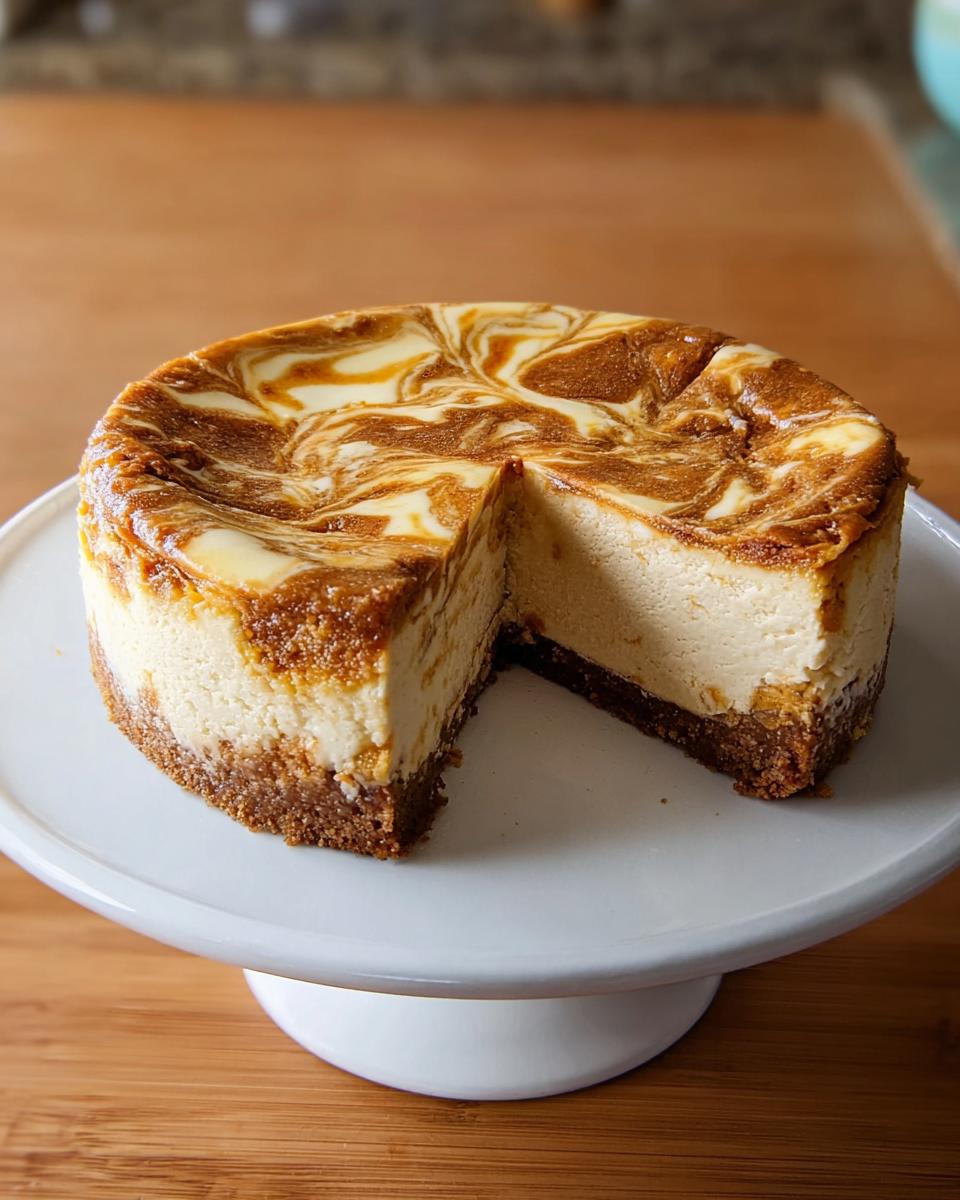
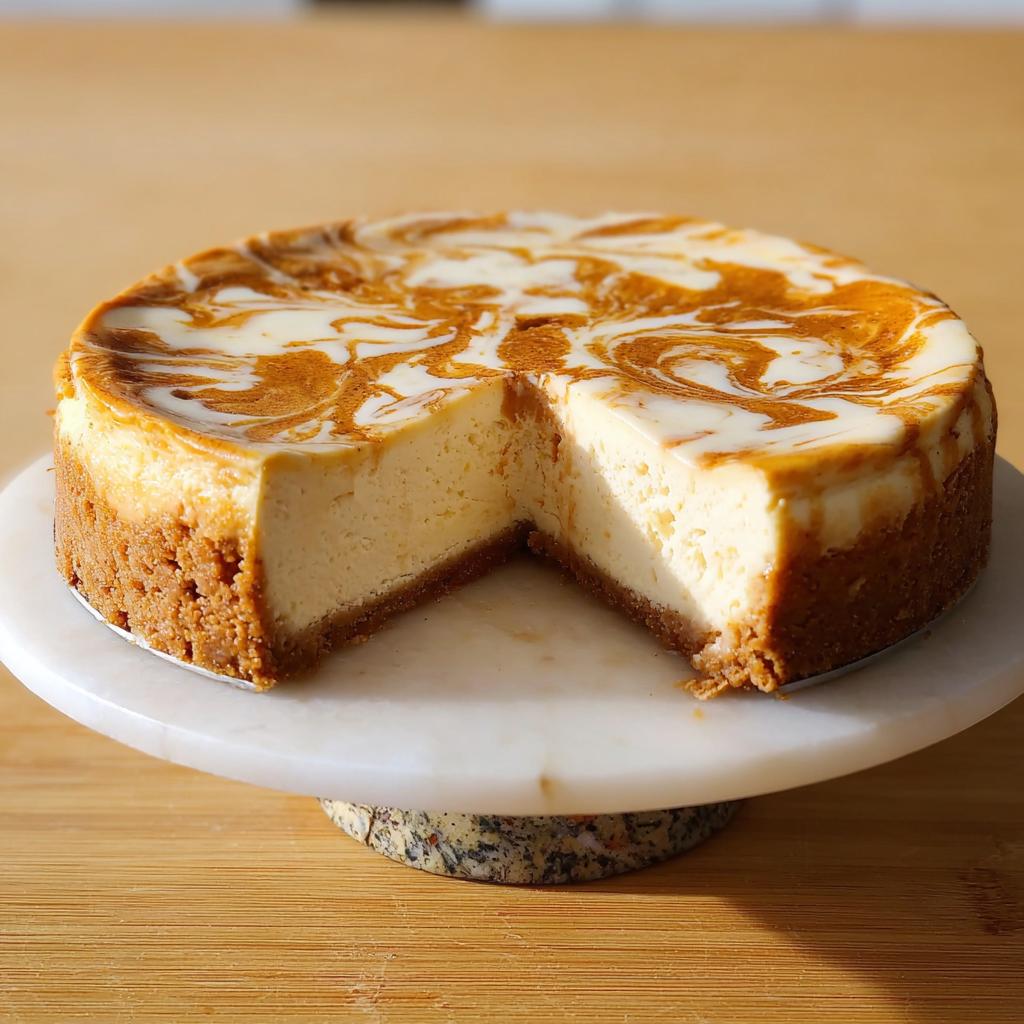
Now for the pretty part! Pour about three-quarters of that luscious cream cheese filling into your cooled crust. Take the remaining quarter of the cream cheese filling and put it in a separate bowl. Add your pumpkin puree, cinnamon, and nutmeg to this smaller batch of filling. Mix it all together until it’s smooth and smells amazing. Then, just randomly drop spoonfuls (about ¼ cup each) of this pumpkin mixture all over the plain cream cheese filling in the pan. Grab a wooden skewer or a toothpick and gently swirl the pumpkin bits into the cream cheese. You can make figure-eights or simple swirls – the key is not to over-swirl, or the colors will just blend together completely. We want that marbled look!
Baking and Cooling Your Pumpkin Cheesecake
Carefully place your foil-wrapped springform pan inside a larger roasting pan. Now, pour that boiling water into the roasting pan. Make sure the water comes about halfway up the sides of your springform pan. This water bath is like a gentle hug for your cheesecake, giving it a super smooth and creamy texture without any cracks. Bake this beautiful creation for about 75 minutes. You want the edges to be set, but the very center should still have a slight wobble when you gently nudge the pan. Once it’s done, carefully take the roasting pan out of the oven. Lift the springform pan out of the water bath and put it on a wire rack. Peel off that foil and just let the cheesecake cool down completely. Don’t be tempted to cut into it yet – patience is key!
The Crucial Refrigeration Step
This part is non-negotiable for the absolute best Pumpkin Cheesecake Swirl Bliss! Once your cheesecake is completely cool, you need to refrigerate it. Uncovered is best. Let it chill for a minimum of 24 hours. Seriously, overnight is great, but 24 hours is ideal. This lets the flavors meld and the texture set perfectly. You can discover more about why chilling is so vital in delicious cooking over here. When it’s time to unmold, just run a thin knife around the edge to loosen it from the sides, then release the springform clasp.
Tips for Perfect Pumpkin Cheesecake Swirl Bliss
Okay, so you’ve got your ingredients ready and you’re almost there! Here are a few little tricks I’ve picked up that really help make this Pumpkin Cheesecake Swirl Bliss turn out absolutely perfect every single time:
- Room Temperature is Key: Seriously, don’t skip softening your cream cheese and eggs! Cold ingredients are the quickest way to a lumpy, uneven cheesecake. It makes such a difference in getting that super smooth, creamy texture we’re after.
- Don’t Overmix the Eggs: I mentioned it before, but it bears repeating. You want to mix the eggs in just until they’re incorporated. Overbeating can whip too much air into the batter, which can lead to cracks as it bakes and cools. We want a smooth, dense, but tender cheesecake!
- The Water Bath is Your Friend: If you’re nervous about cracks or a too-firm texture, that water bath is your secret weapon. It creates a humid, gentle environment for baking that helps the cheesecake cook evenly and stay wonderfully creamy. Just be sure to wrap that pan REALLY well with foil!
- Swirl Smart, Not Hard: For that beautiful marbled effect, don’t go crazy with the skewer! A few gentle swirls are all you need. You want distinct ribbons of pumpkin peeking through, not a muddy brown color. Think elegant, not chaotic.
Ingredient Notes and Substitutions
Okay, let’s chat about a few things in the ingredient list! Sometimes you might not have exactly what’s called for, or maybe you’re curious about options. For this Pumpkin Cheesecake Swirl Bliss, here are a few notes:
- Graham Cracker Crumbs: If you can’t find pre-made crumbs, no worries! Just grab about 8 full graham cracker sheets and pulse them in a food processor until crumbly, or put them in a zip-top bag and crush them with a rolling pin. Super easy. You could also try vanilla wafers or even gingersnap cookies for a fun twist!
- Cream Cheese: Make sure it’s full-fat, block-style cream cheese. The spreadable kind in a tub has too much moisture and won’t give you that classic, rich cheesecake texture. Softened is key, remember?
- Solid-Pack Pumpkin Puree: This is important! Make sure you’re grabbing 100% pure pumpkin puree, not “pumpkin pie filling.” The filling stuff already has sugar and spices, which would mess with our recipe’s balance. That pure pumpkin flavor is what we want for this swirl!
Make-Ahead and Storage for Your Pumpkin Cheesecake
One of the best things about this Pumpkin Cheesecake Swirl Bliss? It’s basically designed to be made ahead! Honestly, it tastes even better after chilling overnight, which means that magical custom_time of 24 hours in the fridge is totally worth it. Just make sure it’s completely cooled before you wrap it tightly in plastic wrap (or better yet, store it in an airtight container) and pop it in the fridge. It’ll stay delicious for about 3-4 days. If you happen to have any leftovers (big ‘if,’ I know!), you can also freeze it! Just wrap it super well once it’s fully chilled. You can learn more about making healthy and delicious meals ahead here.
Frequently Asked Questions about Pumpkin Cheesecake
Got questions about making this dreamy Pumpkin Cheesecake Swirl Bliss? You’re not alone! It’s a fantastic dessert, but sometimes a few little things can cause confusion. Here are some common questions I get:
Why is my cheesecake watery or cracked?
A watery cheesecake often means it wasn’t baked long enough, or the water bath wasn’t effective (check that foil wrapping!). Cracks usually happen from overmixing the eggs, which whips in too much air, or from baking at too high a temperature. Letting it cool slowly and gently, especially in that water bath, really helps prevent both!
Can I freeze this Pumpkin Cheesecake Swirl Bliss?
Oh yes, you absolutely can! Once your gorgeous cheesecake is completely cooled and has had its long chill (remember, at least 24 hours!), wrap it *really* well in plastic wrap, then add a layer of foil or pop it into an airtight container. It should freeze beautifully for about a month. Just thaw it in the refrigerator overnight when you’re ready to enjoy some more of that fall flavor magic.
What can I use instead of graham crackers for the crust?
Great question for switching things up! If you’re not a graham cracker fan or just want to try something different, gingersnap cookies are fantastic with pumpkin – they add even more spice! Vanilla wafers also work well for a milder, sweeter base. Just crush them up the same way and mix with the butter and sugar. It’s a fun way to personalize your thanksgiving baking!
How do I get a really good swirl?
The trick to a great swirl on your Pumpkin Cheesecake Swirl Bliss is to not overdo it! Drop your dollops of pumpkin mixture randomly over the cream cheese filling. Then, take a skewer or knife and make maybe 2-3 gentle passes through the batter. You want distinct swirls, not a totally blended mess. Less is more here to keep that beautiful marbling!
Estimated Nutritional Information
Just a heads-up, these numbers are a close estimate since ingredients can vary a bit! This Pumpkin Cheesecake Swirl Bliss is pretty decadent, so this is for one slice. Expect roughly: Calories: 450-550, Fat: 30-40g, Protein: 7-10g, Carbohydrates: 40-50g. So, enjoy a slice of pure bliss!
Share Your Pumpkin Cheesecake Swirl Bliss Creations!
I’d absolutely LOVE to hear how your Pumpkin Cheesecake Swirl Bliss turned out! Did you try any fun variations? Drop a comment below to share your thoughts, rate the recipe, or even tell me about your baking adventures. You can also connect with me and share your amazing creations – maybe even a picture of that beautiful swirl! If you have any questions or just want to share your baking journey, feel free to reach out via the contact page. Happy baking, everyone!
Pumpkin Cheesecake Swirl Bliss
Ingredients
Equipment
Method
- Preheat your oven to 350°F (175°C). Line the bottom of a 9-inch springform pan with a parchment round.
- In a medium bowl, stir together the graham cracker crumbs, melted butter, and sugar. Press this mixture firmly onto the bottom of the prepared pan. Bake until set, about 10 minutes. Remove the pan from the oven and place it on a wire rack to cool completely.
- Reduce the oven temperature to 325°F (160°C). Wrap the outside of the 9-inch springform pan, containing the cooled crust, with a double layer of aluminum foil. Set a kettle of water to boil for the water bath.
- Using an electric mixer on medium speed, beat the cream cheese until it is fluffy and smooth, approximately 3 minutes.
- Reduce the mixer speed to low. Gradually add the sugar in a slow, steady stream. Add the salt and vanilla extract, and beat until everything is well combined.
- Add the eggs one at a time, beating after each addition just until combined. Be careful not to overmix.
- Pour three-quarters of the cream cheese filling over the prepared crust in the springform pan.
- Transfer the remaining one-quarter of the cream cheese filling to a separate bowl. Add the pumpkin puree, cinnamon, and nutmeg to this bowl and mix until combined.
- Drop 1/4-cup dollops of the pumpkin mixture over the top of the cream cheese filling in the springform pan. Use a wooden skewer or toothpick to gently swirl the pumpkin mixture into the filling, creating a marbled effect.
- Place the foil-wrapped springform pan inside a large, shallow roasting pan. Carefully pour boiling water into the roasting pan, ensuring it comes halfway up the sides of the springform pan. Bake until the cheesecake is set but still slightly wobbly in the center, about 75 minutes.
- Carefully transfer the springform pan from the water bath to a wire rack. Remove the foil and let the cheesecake cool completely. Refrigerate, uncovered, for at least 24 hours. Before unmolding, run a knife around the edge of the cake to loosen it.
Notes
Tried this recipe?
Let us know how it was!Layla Foster is an experienced food writer with a passion for crafting recipes that are vibrant, reliable, and deeply satisfying. With a strong background in home-cooking education and flavor development, Layla has built a trusted voice in the food space—empowering readers to cook with confidence, curiosity, and joy. Today, she proudly shares her work on yummro.com, where she develops flavorful, approachable recipes designed for everyday kitchens and real-world mealtime routines.
Layla’s culinary career began in local community kitchens and event catering, where she learned how to create dishes that were not only delicious, but also adaptable, scalable, and crowd-pleasing. Those early experiences revealed her natural talent for recipe creation and her love of teaching others. Determined to expand her impact, she transitioned into digital food media, producing step-by-step recipes, cooking guides, and inspired meal ideas for a growing online audience. Her approachable teaching style quickly gained attention, allowing her to turn her passion into a full-time career.
Over the years, Layla has collaborated with food startups, cooking instructors, and kitchenware brands to develop recipes and culinary content used by thousands of home cooks. Her recipes have been shared widely across cooking communities and featured in digital roundups for their clarity, balanced flavors, and consistent success. Layla is especially known for her ability to take classic favorites and give them a fresh, modern twist—while still keeping them simple, comforting, and achievable for busy home cooks.